Steb by Step: Katari, Shaman of the Izla Tribe
Heyho Voodoo People,
this week's tutorial voting saw a really close contest between Azog and Katari.
Sixteen people cared and voted, which we are thankful of. Azog recieved an overall score of six votes, while Katari recieved ten. That's not close, not so many votes, but well, decided. The winner is:

Massive Voodoo's year of the painter 2 is proud to present you another article to be added to
one of the biggest miniature painting free tutorial libraries in the web.
This article will be #318.
Let's see the shaman dance around a fire, shall we?
If you want to keep track with an overview on what has happened so far
please check this link!
Roman is now taking over the article. We hope you enjoy!
_______________________________________________________________________________
You want to support us?
If you like to support or say thanks the monkeys of Massive Voodoo in what they do, please feel invited to drop a jungle donation in their direction via paypal or check their miniatures they got on sale here.
_______________________________________________________________________________
FOREWORD
Here we go again... starting a paintjob is always about decisions. You have to decided which colors you use for the different areas of the miniature. Which brand of colors, which saturation and much more. Recently I recieve a lot of questions about my color recipes for different materials and I am frankly here when I say I got none. None specific, I decide from my atmospheric vision I got for the model. Did I just copy this text from last week's step by step?
Yes.
Why?
Because it is the same here, even in the start of it I was not completly sure were this colorful journey on this bust - by Black Crow Miniatures, sculpted by Romain van den Bogeart - would take me.
But let me start from the early beginning, every project for me begins with inspiration.

For Katari my inspiration was Batari.
Really enjoyed the computer game Far Cry some months ago. You are playing a beast tamer neanderthalic pre-historic superhero guy in an unfriendly pre-historic scenario. You tribe is Wenja. There are other tribes too, most of them want to do your folks harm and you gotta protect them.
The setting of this game was something I really enjoyed. Mammoths, Sabretooths and primal action. I hated eagles or a crocodile in this game, everytime an eagle or croc attacked me it scared the shit out of me, but well I am drifting off. Inspiration is always connected to a feeling. If you got the right feeling for your vision on how to paint a sculpt the paintjob is easy. My first recommandation for the right feeling on such a vision is the right music:
Every character in the game looked really primal:

... but there is this one character I really got fascinated by: Batari, the female leader of the Izla tribe. We can agree on the fact that being a female and a leader in a pre-historic tribe is something you gotta be born to do and be though and maybe crazy. The character they transported in the game is all of that. Her tribe - the Izla - prayed to the Sun and burnt poor Wenja alive. And Batari leads them. Quite the nice character. Not, but her visuals fascinated me and when I saw the sculpt of Romain I knew I want to do something like that with her:

The vision was born from the inspiration.
Although these thoughts do not appear to me like: Hey I exactly want to do this or paint this on that bust. Like I said earlier, it is more a feeling that I carry in me. A feeling that grows, silent ideas, deep quiet thoughts. If the call is strong enough and if I find my right canvas I answer the call.
I wanted to do a shaman of the Izla Tribe. Kind of a tribute to Batari, but with a different name and my wonderful mind came up with Katari. Splendid.
The Paintjob
I started this bust for explanation purposes during a cool MV private coaching with Evgeny.
While I prepared the resin bust I played a bit with the feathers' position, but this looked rather stupid and I imagined her to run around in pre-historic swamps hiding from predators with this on her head. Stupid, but could have been natural selection though.

Primed her black and white. Sprayed a very orange dark brown base tone to her skin ...

... with a great painting tool from Harder & Steenbeck. I lovely call it "my color catapult". Why do I tell you? Well I am not a good example on how to properly work with an airbrush, but I love to do it :)
My precious color catapult!

During the private coaching and the explanations with Evgeny I placed more highlights in her skin, added all other basecolors and blocked out areas that were still primed (for example necklace) with a dark tone as I was not sure what to do with it right now.
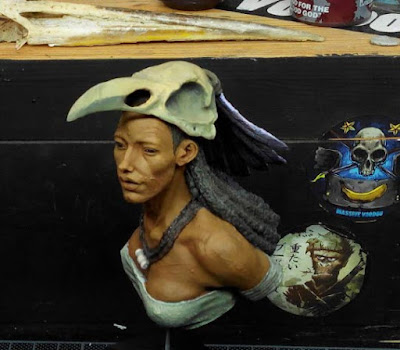


After the private coaching
I was taking a close look on my actual project. Of course I had to stick to some guidelines and educational steps in the coaching with Evgeny and I personally was not so happy with what I did in the coaching, concerning my vision. Far from it. I could cry.

... but I did not cry.
I checked back with my inspirational photo I got there and knew I needed orange. More orange for my vision. As I was in a brave painting mood this day I decided to gently spray a glaze of orange to her skin to see the outcome and if my feeling was right.

I quickly realized I wanted to get as close to my vision as possible and as fast as possible. I heard a voice within me, saying that if I would not do this step I might lose motivation on this project/vision.
So I used a strong blue to add the warpaint, it was a mix from a Vallejo Blue (base) something and a test of the blue flou from Vallejo on top of it (highlights). I was not so convinced, because the blue flou made it shiny, but well I knew Matte Varnish and my airbrush are close. No need to worry right now.
That actually was something I would loved to have done in the coaching, but Evgeny and I had different teaching topics and I would not risk to confuse my student with going mad like this and quick and dirty and such.

I was more happy now, but still a lot of work awaited me. Once my dad brought me a bird's skull from the forest and I really cherish this one in my collection. It is great for studying. So if you want to paint a birds skull or any sort of skull it is a good recommendation to have a look on the real thing first.


Well, I actually got pretty scared looking at this and I was not to paint up all the details you can study on the real thing, but I got quite well inspired from it. What really helped me to go further in the bust was placing the inspirational photo behind the bust to see if I want to add more oranges to everything as thin airbrushed glazes/filters. I did btw.

I even tried the not so magic trick I already did with Abalam - the Prince of Hell and put a lid lighter to the bust in a dark cabinet and took a photo, a shaky one. If you do such things, do not burn your painted resin on accident.

I decided to not go for it this time.
So with my glazes/filters of orange I lost depth or contrast and also the blue warpaint lost power. Of course, I was putting a one colored filter on top of it. Several thin ones. You can see this quite good in the next photo. Everything is losing powers, but orange gets stronger. Just what I wanted.
One other thing. The original sculpt is build with what I used as earings as jewelry on the skull. I liked it that way, but needed to find something else for the skull now.

I went for shells from a kids necklace I found. They just had the right size.

I even thought of using these, but in the end: no.

I took a photo of the shells without primer to paint them in a similar way. With the photo I had the chance to check back on the real thing.

Ready to be painted.

It was time to work back on both, details and contrast. Also added the painted shells with the help of string and carfully placed superglue. I added more contrast to the skin by increasing the shadows with dark browns and increasing the highlights with some yellowish/orange/white mix. Slowly. In between I sprayed orange filters here and there, just as I did see fit.

My blues did lose so much of their power. Time to go primal and bring back power. Using Ultramarine Pigments from an Art store here and adding matte varnish to it gave me a pigment paste that I was able to slap on my poor blues, to enrichen them. BOOM!

I worked some more here and there, added small edge highlights here and there and tickled on some fine detail highlights here and there. I really enjoyed her outcome and her look, she was the exact outcome from my vision I had for her. Compared to the spartan this lady got power of colors, while the Spartan got power of ... yeah, being spartan.

In the end I hope you enjoyed the article. The walkthrough, the thoughts behind the curtain, the steps. Even this article finds an abrupt end and gives you not much insight into color recipes I still do hope you find it inspirational. Thanks for your time reading it.
_______________________________________________________________________________
You want to support us?
If you like to support or say thanks the monkeys of Massive Voodoo in what they do, please feel invited to drop a jungle donation in their direction via paypal or check their miniatures they got on sale here.
_______________________________________________________________________________
Katari - Shaman of the Izla Tribe
Black Crow Miniatures, 1:9

20.000 B.C.
Katari, famous in her tribe to speak with the god of fire, to see the signs, to know the way.
Katari is the one the tribe depends in time of trouble or in question of sacrifice. The god leads through her,
she speaks his voice and the tribe follows.
Back to primitive. Back to primal.
Really a joy to paint this beautiful bust. Like always I can not resist Romain's sculptures very long, theyalways find their way back to my table. I really enjoyed playing the computer game "Far Cry - Primal". I was scared through run through primal lands, fought sabre tooths and cave bears with a piece of wood and became a powerful Wenja in this game. This game gave a lot of inspiration to this one and I really enjoyed the game soundtrack while I was painting her!
"Haiwoghasha. Sa Izla. Muo Wenja adam. Tuschi dahah."


this week's tutorial voting saw a really close contest between Azog and Katari.
Sixteen people cared and voted, which we are thankful of. Azog recieved an overall score of six votes, while Katari recieved ten. That's not close, not so many votes, but well, decided. The winner is:
Massive Voodoo's year of the painter 2 is proud to present you another article to be added to
one of the biggest miniature painting free tutorial libraries in the web.
This article will be #318.
Let's see the shaman dance around a fire, shall we?
If you want to keep track with an overview on what has happened so far
please check this link!
Roman is now taking over the article. We hope you enjoy!
_______________________________________________________________________________
You want to support us?
If you like to support or say thanks the monkeys of Massive Voodoo in what they do, please feel invited to drop a jungle donation in their direction via paypal or check their miniatures they got on sale here.
_______________________________________________________________________________
FOREWORD
Here we go again... starting a paintjob is always about decisions. You have to decided which colors you use for the different areas of the miniature. Which brand of colors, which saturation and much more. Recently I recieve a lot of questions about my color recipes for different materials and I am frankly here when I say I got none. None specific, I decide from my atmospheric vision I got for the model. Did I just copy this text from last week's step by step?
Yes.
Why?
Because it is the same here, even in the start of it I was not completly sure were this colorful journey on this bust - by Black Crow Miniatures, sculpted by Romain van den Bogeart - would take me.
But let me start from the early beginning, every project for me begins with inspiration.
Katari, Shaman of the Izla Tribe

For Katari my inspiration was Batari.
Really enjoyed the computer game Far Cry some months ago. You are playing a beast tamer neanderthalic pre-historic superhero guy in an unfriendly pre-historic scenario. You tribe is Wenja. There are other tribes too, most of them want to do your folks harm and you gotta protect them.
The setting of this game was something I really enjoyed. Mammoths, Sabretooths and primal action. I hated eagles or a crocodile in this game, everytime an eagle or croc attacked me it scared the shit out of me, but well I am drifting off. Inspiration is always connected to a feeling. If you got the right feeling for your vision on how to paint a sculpt the paintjob is easy. My first recommandation for the right feeling on such a vision is the right music:
Every character in the game looked really primal:

... but there is this one character I really got fascinated by: Batari, the female leader of the Izla tribe. We can agree on the fact that being a female and a leader in a pre-historic tribe is something you gotta be born to do and be though and maybe crazy. The character they transported in the game is all of that. Her tribe - the Izla - prayed to the Sun and burnt poor Wenja alive. And Batari leads them. Quite the nice character. Not, but her visuals fascinated me and when I saw the sculpt of Romain I knew I want to do something like that with her:
Batari

The vision was born from the inspiration.
Although these thoughts do not appear to me like: Hey I exactly want to do this or paint this on that bust. Like I said earlier, it is more a feeling that I carry in me. A feeling that grows, silent ideas, deep quiet thoughts. If the call is strong enough and if I find my right canvas I answer the call.
I wanted to do a shaman of the Izla Tribe. Kind of a tribute to Batari, but with a different name and my wonderful mind came up with Katari. Splendid.
The Paintjob
I started this bust for explanation purposes during a cool MV private coaching with Evgeny.
While I prepared the resin bust I played a bit with the feathers' position, but this looked rather stupid and I imagined her to run around in pre-historic swamps hiding from predators with this on her head. Stupid, but could have been natural selection though.

Primed her black and white. Sprayed a very orange dark brown base tone to her skin ...

... with a great painting tool from Harder & Steenbeck. I lovely call it "my color catapult". Why do I tell you? Well I am not a good example on how to properly work with an airbrush, but I love to do it :)
My precious color catapult!

During the private coaching and the explanations with Evgeny I placed more highlights in her skin, added all other basecolors and blocked out areas that were still primed (for example necklace) with a dark tone as I was not sure what to do with it right now.

While I painted the eyes some dark reds appeared on such areas.

Power of the colorful shaman feathers. BAM! BAM! Rough Work!

After the private coaching
I was taking a close look on my actual project. Of course I had to stick to some guidelines and educational steps in the coaching with Evgeny and I personally was not so happy with what I did in the coaching, concerning my vision. Far from it. I could cry.

... but I did not cry.
I checked back with my inspirational photo I got there and knew I needed orange. More orange for my vision. As I was in a brave painting mood this day I decided to gently spray a glaze of orange to her skin to see the outcome and if my feeling was right.

I quickly realized I wanted to get as close to my vision as possible and as fast as possible. I heard a voice within me, saying that if I would not do this step I might lose motivation on this project/vision.
So I used a strong blue to add the warpaint, it was a mix from a Vallejo Blue (base) something and a test of the blue flou from Vallejo on top of it (highlights). I was not so convinced, because the blue flou made it shiny, but well I knew Matte Varnish and my airbrush are close. No need to worry right now.
That actually was something I would loved to have done in the coaching, but Evgeny and I had different teaching topics and I would not risk to confuse my student with going mad like this and quick and dirty and such.

I was more happy now, but still a lot of work awaited me. Once my dad brought me a bird's skull from the forest and I really cherish this one in my collection. It is great for studying. So if you want to paint a birds skull or any sort of skull it is a good recommendation to have a look on the real thing first.

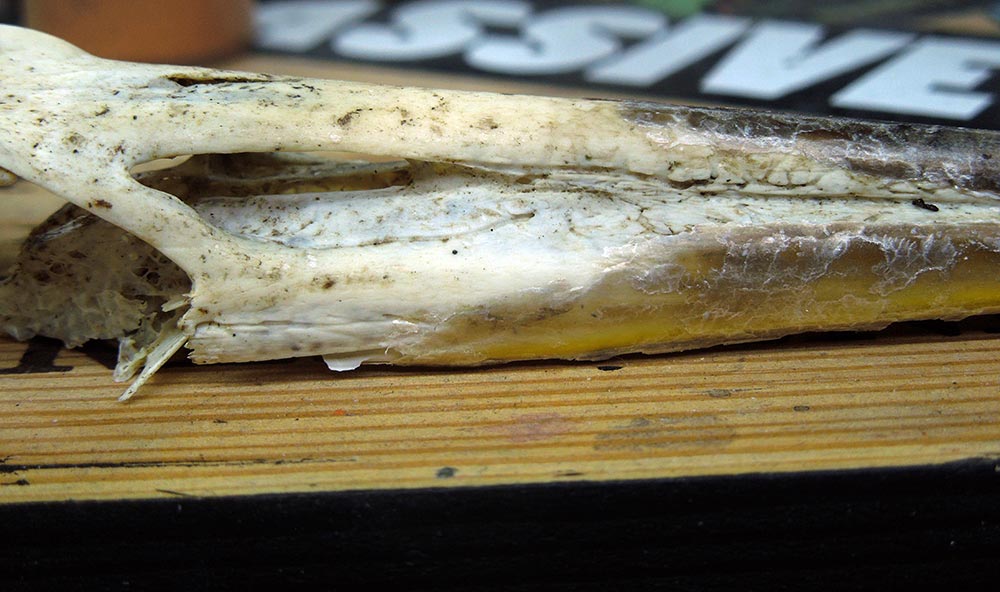


Well, I actually got pretty scared looking at this and I was not to paint up all the details you can study on the real thing, but I got quite well inspired from it. What really helped me to go further in the bust was placing the inspirational photo behind the bust to see if I want to add more oranges to everything as thin airbrushed glazes/filters. I did btw.

I even tried the not so magic trick I already did with Abalam - the Prince of Hell and put a lid lighter to the bust in a dark cabinet and took a photo, a shaky one. If you do such things, do not burn your painted resin on accident.

I decided to not go for it this time.
So with my glazes/filters of orange I lost depth or contrast and also the blue warpaint lost power. Of course, I was putting a one colored filter on top of it. Several thin ones. You can see this quite good in the next photo. Everything is losing powers, but orange gets stronger. Just what I wanted.
One other thing. The original sculpt is build with what I used as earings as jewelry on the skull. I liked it that way, but needed to find something else for the skull now.

I went for shells from a kids necklace I found. They just had the right size.

I even thought of using these, but in the end: no.

I took a photo of the shells without primer to paint them in a similar way. With the photo I had the chance to check back on the real thing.

Ready to be painted.

It was time to work back on both, details and contrast. Also added the painted shells with the help of string and carfully placed superglue. I added more contrast to the skin by increasing the shadows with dark browns and increasing the highlights with some yellowish/orange/white mix. Slowly. In between I sprayed orange filters here and there, just as I did see fit.

My blues did lose so much of their power. Time to go primal and bring back power. Using Ultramarine Pigments from an Art store here and adding matte varnish to it gave me a pigment paste that I was able to slap on my poor blues, to enrichen them. BOOM!

I worked some more here and there, added small edge highlights here and there and tickled on some fine detail highlights here and there. I really enjoyed her outcome and her look, she was the exact outcome from my vision I had for her. Compared to the spartan this lady got power of colors, while the Spartan got power of ... yeah, being spartan.

In the end I hope you enjoyed the article. The walkthrough, the thoughts behind the curtain, the steps. Even this article finds an abrupt end and gives you not much insight into color recipes I still do hope you find it inspirational. Thanks for your time reading it.
_______________________________________________________________________________
You want to support us?
If you like to support or say thanks the monkeys of Massive Voodoo in what they do, please feel invited to drop a jungle donation in their direction via paypal or check their miniatures they got on sale here.
_______________________________________________________________________________
Katari - Shaman of the Izla Tribe
Black Crow Miniatures, 1:9

20.000 B.C.
Katari, famous in her tribe to speak with the god of fire, to see the signs, to know the way.
Katari is the one the tribe depends in time of trouble or in question of sacrifice. The god leads through her,
she speaks his voice and the tribe follows.
Back to primitive. Back to primal.
Really a joy to paint this beautiful bust. Like always I can not resist Romain's sculptures very long, theyalways find their way back to my table. I really enjoyed playing the computer game "Far Cry - Primal". I was scared through run through primal lands, fought sabre tooths and cave bears with a piece of wood and became a powerful Wenja in this game. This game gave a lot of inspiration to this one and I really enjoyed the game soundtrack while I was painting her!
"Haiwoghasha. Sa Izla. Muo Wenja adam. Tuschi dahah."


You can find more photos of her on Putty&Paint.
If you enjoyed the article or the like the end result, drop a vote or a comment there.
I would appreciate it.
Keep on happy painting!
The bust of Katari is on Sale.
If you are interested in making her yours please contact: jarhead(at)massivevoodoo.com


